The Alien Destroyer: Difference between revisions
(→Intro) |
No edit summary |
||
| (20 intermediate revisions by 5 users not shown) | |||
| Line 1: | Line 1: | ||
[[File: | [[File:destroyer_picture.jpg|right|500px]] | ||
=Intro= | ==Intro== | ||
'''Sector''': [[Former Federation sectors]]<br/> | |||
'''System''': [[Velorum]]<br/> | |||
'''Location''': [[Water Harvest]]<br/> | |||
'''Min. clearance level''': 7<br/> | |||
'''Ship ranks''': 7-9, 10-12, 13-17<br/> | |||
==Task== | |||
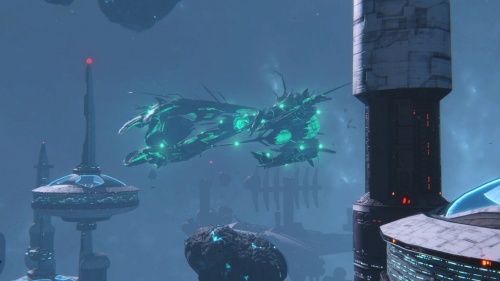
Our sector has been attacked by a special alien ship. It is necessary to protect the sector. Destroy the Alien Destroyer and protect the outposts. | |||
===The Alien Destroyer=== | ===The Alien Destroyer=== | ||
A unique, extremely tanky and dangerous ship, also the | A unique, extremely tanky and dangerous ship, also the only ship a player will battle against in this mission. The goal is to stop it from destroying the stations, its health bar is displayed on top of the screen like a boss battle. It has a large pool of hitpoints and uses emitters with different damage types and properties (EM and thermal). The best method is to start by destroying its cores from a distance, it is not advised to stay close. Destroying the cores will reduce its health considerably triggering a retreat sequence. Destroying the emitters will deal extra damage to the Alien Destroyer, that damage and the overall difficulty vary throughout the difficulty levels. | ||
==Stages== | |||
The stage is only one. Be careful, in case of loss of all ships, the mission will be failed. | |||
==Strategy== | ==Strategy== | ||
It is recommended to use a frigate or a fighter, using a interceptor might prove to be very difficult as a little mistake can kill you. Best ship classes for the mission are gunships (any), | It is recommended to use a frigate or a fighter, using a interceptor might prove to be very difficult as a little mistake can kill you. Taking destroyers as damage dealers is highly recommended. | ||
Be sure to equip IR-Flares as Destroyer has a nasty habits to send multiple missiles. You can end up with up to 8 missile locks! | |||
Best ship classes for the mission are gunships (any), commands (any), destroyers and the covert ops (any). The recommended weapons are the Coil Mortar, Singularity Cannon and any other fast firing EM weapon (for fighters) as well as the Phase Suppressor or other conventional EM weapon (if the player chooses to fly an interceptor). Explosion weaponry is a key to success on this map - conventional weapons wont be able to do enough damage over time to take down the Destroyer. When fighting The Destroyer, explosive projectile weapons can damage multiple emitters and in the same time deal damage to the Destroyer itself. | |||
The Alien Destroyer will spawn from an Alien Rift at the beginning of the mission, immediately after exiting the gate it will try to destroy the outpost with torpedoes. Covert Ops ships are great for countering the torpedoes via tactical nukes, destroying them in one big explosion blast. Dealing damage to the Destroyer will trigger it's impenetrable shields that the players need to take down before proceeding with the main goal of the mission - stopping the ship. When the shields are down, the emitters switch to lasers dealing tremendous amounts of damage that can kill any ship in seconds. Caution is advised. | |||
The ship will alternate between firing torpedoes, triggering its shields, lasers and launching tracking projectiles at players (those projectiles have similar characteristics as misiles) until every core is destroyed. It's difficult to destroy the cores, there's 4 of them and every core is shielded by a huge piece of armor that respawns over time. Taking down the cores of the ship will trigger a retreat mechanism and the Destroyer will try to flee. At that moment it's really important to destroy as many emitters as possible before the ship manages to flee which will cause the mission to fail. | |||
It is advised to make a team with at least one or two engineering ships for healing the team members, one command ship for damage, resists and speed buffs, guard ship/s for the missile shield against the tracking projectiles, covert ops (optional pick) for nuking and bombing strategic parts of the ship and, the last but not least, LRFs, gunships and destroyers for the sheer damage purpose. | |||
= | ==Reward== | ||
If the team manages to fulfill the mission objectives and succeed in stopping the Alien Destroyer with all stations intact, the mission will reward each player with 3 rare loot searches that can grant different amount of {{I}}. | |||
=Gameplay= | |||
==Gameplay== | |||
<div style="margin: 5px 25px 10px 5px; display: inline-block; vertical-align: top; text-align: center;"> | <div style="margin: 5px 25px 10px 5px; display: inline-block; vertical-align: top; text-align: center;"> | ||
<embedvideo service="youtube" dimensions="500x240" alignment="center"> | <embedvideo service="youtube" dimensions="500x240" alignment="center">https://www.youtube.com/watch?v=2HxY3TalYDw</embedvideo> | ||
</div> | </div> | ||
<div style="margin: 5px 25px 10px 5px; display: inline-block; vertical-align: top; text-align: center;"> | |||
<embedvideo service="youtube" dimensions="500x240" alignment="center">https://www.youtube.com/watch?v=rLqYRgAQ4N0</embedvideo> | |||
</div> | |||
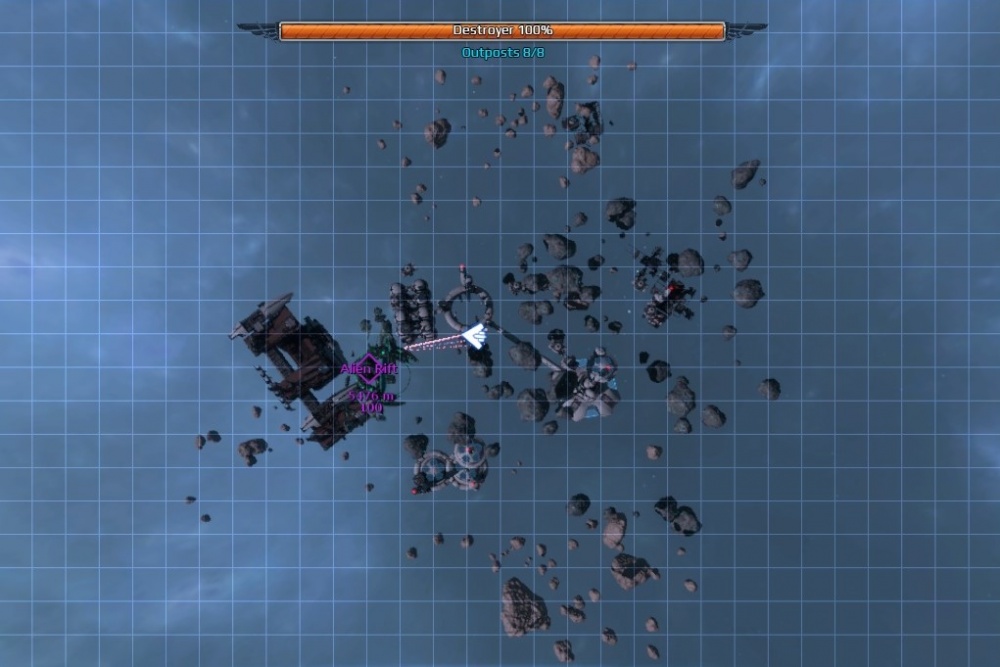
==Tactical map== | |||
[[File:The Alien Destroyer (map).jpg|1000px]] | |||
{| border="0" align="center" width="100%" | |||
|height="5"| | |||
|} | |||
<div style="border-radius: 4px; border: 1px solid #8E8E8E; background-color: #BFBFBF; margin: 0 0 10px; align=center; padding: 8px;"> | |||
{| border="0" align="center" width="100%" | |||
|- | |||
|height="0"| | |||
|- | |||
|width="100"| | |||
|align="center"|[[File:Leagues_button_icon.png|link=Portals and Tournaments|78px]] | |||
|width="10"| | |||
|align="center"|[[File:Pvp_button_icon.png|link=PvP Arena|275px]] | |||
|width="10"| | |||
|align="center"|[[File:Pve_button_icon.png|link=Missions|Missions (PvE)|275px]] | |||
|width="10"| | |||
|align="center"|[[File:Coop_button_icon.png|link=Skirmish (CO-OP)|275px]] | |||
|width="10"| | |||
|align="center"|[[File:Open_Space_button_icon.png|link=Open Space|78px]] | |||
|width="10"| | |||
|align="center"|[[File:Sector_conquest_button_icon.png|link=Conquest|Sector Conquest|78px]] | |||
|width="100"| | |||
|- | |||
| | |||
|} | |||
</div> | |||
[[Category:Missions]] | |||
Latest revision as of 07:42, 23 October 2019

Intro
Sector: Former Federation sectors
System: Velorum
Location: Water Harvest
Min. clearance level: 7
Ship ranks: 7-9, 10-12, 13-17
Task
Our sector has been attacked by a special alien ship. It is necessary to protect the sector. Destroy the Alien Destroyer and protect the outposts.
The Alien Destroyer
A unique, extremely tanky and dangerous ship, also the only ship a player will battle against in this mission. The goal is to stop it from destroying the stations, its health bar is displayed on top of the screen like a boss battle. It has a large pool of hitpoints and uses emitters with different damage types and properties (EM and thermal). The best method is to start by destroying its cores from a distance, it is not advised to stay close. Destroying the cores will reduce its health considerably triggering a retreat sequence. Destroying the emitters will deal extra damage to the Alien Destroyer, that damage and the overall difficulty vary throughout the difficulty levels.
Stages
The stage is only one. Be careful, in case of loss of all ships, the mission will be failed.
Strategy
It is recommended to use a frigate or a fighter, using a interceptor might prove to be very difficult as a little mistake can kill you. Taking destroyers as damage dealers is highly recommended.
Be sure to equip IR-Flares as Destroyer has a nasty habits to send multiple missiles. You can end up with up to 8 missile locks!
Best ship classes for the mission are gunships (any), commands (any), destroyers and the covert ops (any). The recommended weapons are the Coil Mortar, Singularity Cannon and any other fast firing EM weapon (for fighters) as well as the Phase Suppressor or other conventional EM weapon (if the player chooses to fly an interceptor). Explosion weaponry is a key to success on this map - conventional weapons wont be able to do enough damage over time to take down the Destroyer. When fighting The Destroyer, explosive projectile weapons can damage multiple emitters and in the same time deal damage to the Destroyer itself.
The Alien Destroyer will spawn from an Alien Rift at the beginning of the mission, immediately after exiting the gate it will try to destroy the outpost with torpedoes. Covert Ops ships are great for countering the torpedoes via tactical nukes, destroying them in one big explosion blast. Dealing damage to the Destroyer will trigger it's impenetrable shields that the players need to take down before proceeding with the main goal of the mission - stopping the ship. When the shields are down, the emitters switch to lasers dealing tremendous amounts of damage that can kill any ship in seconds. Caution is advised.
The ship will alternate between firing torpedoes, triggering its shields, lasers and launching tracking projectiles at players (those projectiles have similar characteristics as misiles) until every core is destroyed. It's difficult to destroy the cores, there's 4 of them and every core is shielded by a huge piece of armor that respawns over time. Taking down the cores of the ship will trigger a retreat mechanism and the Destroyer will try to flee. At that moment it's really important to destroy as many emitters as possible before the ship manages to flee which will cause the mission to fail.
It is advised to make a team with at least one or two engineering ships for healing the team members, one command ship for damage, resists and speed buffs, guard ship/s for the missile shield against the tracking projectiles, covert ops (optional pick) for nuking and bombing strategic parts of the ship and, the last but not least, LRFs, gunships and destroyers for the sheer damage purpose.
Reward
If the team manages to fulfill the mission objectives and succeed in stopping the Alien Destroyer with all stations intact, the mission will reward each player with 3 rare loot searches that can grant different amount of ![]() .
.
