Sector Conquest Guide
The following is based on this guide. Viewing the original might be of interest. Ask around on the forums or in your corporation if you have questions.
Basic Terminology
- Sector Conquest = Sec Con = Dreads (foreign players will often say dreads)
- CC: stands for Crowd Control, which refers to anything like a stun or slow, delivered mostly in Star Conflict by ECMs, Tacklers, and Guards. Even sensors being jammed can be considered a form of CC.
- DPS: stands for Damage Per Second. This generally means how much damage you are dealing, but is best used to talk about doing large amounts of damage in a short period of time.
- DPM: stands for Damage Per Minute. This can also mean how much damage is being dealt, but has a slightly different connotation in that this refers to sustained damage. For example, a gunship might have the highest DPS capabilities, but lower DPM capabilities than a destroyer due to their reliance on their Special Module and Firestorm.
- EHP: stands for Effective Hit Points or Effective Health Points, this is technically measured with Survivability. This means how much raw damage you can take, and, in Star Conflict, actually refers to your max shield and max hull after counting resistances. As an example, if you had resistances on both shield and hull that blocked 50% of damage, and you had 10,000 shield and 15,000 hull, your EHP would be 50,000 (calculated by [shield points]*[1.0+[damage % blocked/100]] + [hull points]*[1.0+[damage % blocked/100]]). In Star Conflict, you will have an EHP for all 3 different types of damage. This stat is important because all DPS is measured raw and subtracted from by resistances. However, it is important to consider that an engineer has flat hp healing, and therefore can heal your EHP much more quickly if you lean towards resistance tanking than health tanking. Additionally, you can have higher EHP to certain resistances, so this is something to be mindful of.
- Meta: stands for wikipedia:Metagame, i.e. the strategy/tactics/ships used most predominantly in the competetive playerbase.
Basics of Sector Conquest
- At the top of the screen, you will see two images representing your dread and the enemy’s dread. They have fleet points, which can be thought of as your dread’s “HP,” called fleet points, although it never truly dies. Additionally, you can see its shields charging as an outline around the dread, which blocks some of the damage. Dreads have hp in the millions, so directly damaging them is not a viable option.
- At the end of the battle (when either one team loses all their fleet points or the time limit has been reached), the team with more fleet points wins.
- There are asteroids that spawn from one side of the map and move relatively quickly. These will always do more collision damage than you will expect, so take extreme caution.
- Each dread has engines which will instantly kill you if you fly into them. Additionally, each dread has a good mixture of Plasma Turrets and Thermal Turrets. Plasma turrets have high fire rate, projectile speed, and turn rate, so they are decent threats to fighters and interceptors, while Thermal Turrets have slow fire rates, projectile speed, and turn rates, so they threaten bigger targets (like Combat Drones, which will eventually die to your dread) and occasionally catch smaller targets.
- Each dread will launch Combat Drones periodically. Killing combat drones subtract only one fleet point, however, they are quite strong and can make quick work of player ships, which costs you 25 points. Therefore, it’s recommended you kill combat drones when you have nothing better to do.
- Every dread’s major calibers will shoot periodically - they charge and fire as a big white laser. If your ship is in one of these lasers, move immediately. It’s a rather embarrassing way to die since each laser does 100,000 white damage.
- Most dreads will also periodically launch torpedoes, since these will subtract 50 fleet points (depending on the shields charged) from a dread if they successfully connect. This is why each team should have at least one empire LRF because they make the quickest work of these torpedoes from a safe distance. The explosion of a torpedo does do a fair amount of damage. Note that some dreads are built with what are basically warp gates that take you to the other dread: this is NOT recommended to have on your dread and a sign of an amateur corporation.
- As said before, killing players will subtract 25 fleet points.
- There are 3 base dreads, the Empire, Federation, and Jericho dreads. Empire dreads do more damage with major calibres, Federation dreads have 400 more fleet points and spawn more dangerous combat drones, and Jericho dreads have enhanced shield regeneration. The best dread (the one that will win if players do nothing) changes from patch to patch, so try to have all 3 ready.
- Each dread has three systems, one for the Command Tower, one for Shields, and one for Weapons. Generally these are Shield Emitters and Weapon Coolers. Destroying a system has unique but devastating consequences. These can be captured like beacons or dealt half their capture progress per bomb planted (in a similar way to the Detonation game mode).
- Eliminating the Command Tower does 250 damage to the dread, stops the spawning of Combat Drones, and limits the respawn of enemies to be like the Beacon Capture mode, where you only have one life on each ship. This generally spells doom for a wing, since key ships like Engineers and LRFs are taken in low numbers.
- Eliminating the Shield system does 200 damage to the dread and lowers the shield regeneration of the dread, with long-lasting consequences since shields block all incoming damage from the other dread’s major calibers and torpedoes.
- Eliminating the Weapon system does 200 damage to the dread and weakens the major calibers of the dread, lowering the amount of damage dealt in the long run.
- Each dread will spawn a bomb every two minutes after the last bomb has been picked up, starting two minutes into the battle. They work similarly to detonation bombs, but instead of being “lost,” they will detonate, doing damage. These bombs can be planted on systems in a similar manner to the detonation game mode, doing 100 damage to fleet points and taking half of a system’s capture progress. Against coordinated wings, this may be the only way you end up destroying a system. However, since all systems are close together and there is some level of coordination between all good teams in sector conquest, it is difficult to plant in any random ship. Normally a Karud or Boremys handle bomb planting, since they are extremely durable.
- Each system has strategic advantages and disadvantages to attempting to capture: since Command Tower is the system with the most immediate value and spells impending doom upon being lost, most wings will more heavily defend this system by default, meaning that Weapon and Shield are easier to gain access to, and since Shield is on the bottom of each dread, this effect is somewhat increased for Shield. Shield and Weapon can be extremely rewarding in a different way. In the long run, the increased damage that dread takes relative to the other upon losing either of these systems can win or lose a battle.
- Sensor range is dramatically decreased in this game mode, and weapon range is somewhat decreased, but active module range (for example, on Command fighters) is the same.
Why play sector conquest (Sec Con)?
Pros:
- Monocrystal, Xenocrystal, Composite block rewards given in the mail every day. If you don’t need them you can sell them for GS which you can use for whatever purpose you desire. Premium time (for faster levelling/credits), premium ships etc. It is possible to get 100 of these crystals in an active corporation with high influence.
- Intense 10v10 tactical combat
- Influence leaderboard where you can compare yourself to other players in your corporation.
- The more any corporation earns influence, the more rewards everyone gets. This is in proportion to your contribution in influence.
- Rewards loyalty to the corporation. The influence you earn stacks up and when it does you’ll be earning lots in no time.
Cons:
- Confusing and noisy at first, with massive guns firing from both dreadnoughts. You will die to the major caliber at first or realize you can’t fight 5 combat drones at once.
- Takes a while for you to climb the influence leaderboards, so at first (say at 1000 influence) you’ll earn very little, but the more you contribute, the more you earn over time.
- Complex scoring system.
How it works
Give the Sector_Conquest page a read first.
Fleet points acts as HP of the dreadnoughts, if either dread hits 0 or 12 minutes have elapsed the game ends. As the other page states, the influence you get depends on how many fleet points you take from the enemy dread divided among players depending on your efficiency. For example, you are in a team of 3, you get 2000 eff, and your two allies get 1000 eff each. You have 50% share so you earn 50% of the fleet points your team took from the enemy dread. This means if you are playing with players outside of your corporation, it is in your best interest to maximize your efficiency rather than trying to take fleet points from the enemy dread.
Good ways to maximize your efficiency include:
- Destroying or helping destroy combat drones, these spawn every few mins and are worth a full kill worth of efficiency. (up to 150 points)
- Destroying or helping destroy enemy players/bots, like the drones but “smarter” and not as tough. (again up to 150 points)
- Being involved in a capture of a enemy dreadnought sub-system. (600 points)
- Destroying enemy turrets on their dread, the big turrets are invincible but there are smaller turrets that are hard to see but can be destroyed in 3 or 4 sniper shots (60 points per turret). These small turrets hit VERY hard so by sniping them off you also help your team win.
- Sniping torpedoes (30 points per torpedo) but you can one shot them. Remember to lock on.
Do not:
- Pick up the bomb and attempt to plant it unless you know the sub-system you’re going to plant it is free from turrets and enemies There is a place for defensive bombs but they are highly situational.
- “Attack” the enemy dread alone, flying close to 7000 meters will cause you to be focus fired by the enemy team. Flying in and dying just costs your team 25 fleet points.
- Ignore the enemy bomb runners and capturers (unless you’re too far away and too slow).
- Expect your team to do anything, even fellow corp members. Don’t expect engineers to heal you as they might be desperately trying to stop an enemy from planting the bomb and winning the game for their team. Be self sufficient, stay calm and only trust yourself.
- Give up. If a game is going badly, farm some efficiency so you walk away with 200 influence rather than 0. On the other hand, winning against a bad team by a smaller margin is less profitable than winning with a large margin e.g. a 5 min game where you earn 1000 influence is a lot better than a 10 min game where you earn 500 influence.
When playing against bots or with a significant advantage (anything less than 6v10):
Tl;dr: Command Tower first, Shield Emitter second, and Weapon Cooler last.
- Move toward the command tower and capture it. Kill turrets, the “easier” bots (as in DO NOT challenge the bot Thar’Ga), and structures on your dreadnought along the way.
- Send one person to pick up the bomb after this. The rest of the team moves to Shield Emitter (DO NOT GO TO WEAPON COOLER) and clears the resistance so that the bomb can be planted.
- Now move to weapon cooler. WAIT FOR THE SECOND BOMB IF THE BOTS ARE ABOVE 500 POINTS AT THIS POINT.
Reasoning for this methodology:
- Capturing Command Tower first gives the most points and will cause the combat drones to stop spawning and limit the bot Thar’Ga respawn rate. The rest of the points can easily be taken by systems and structures and the bots do not need to spawn more than 5 times. Capturing Shield Emitter second allows the allied dreadnought's major calibers to do more damage. Additionally, waiting to plant a bomb allows us to do 100 more damage to the enemy dreadnought. Always save Weapon Cooler for the last capture, since it does the least overall damage and it is not worth investing time to capture the Weapon Cooler, since the tactical advantage it gives (the enemy dreadnought's Major Calibers do less damage to our dreadnought) is not relevant to a battle when you have a significant advantage.
How To LRF
At least one Sniper is mandatory, make sure one of the group’s players are on an empire LRF. Jericho LRFs are considered undesirable in almost all circumstances and should be avoided. As an LRF, your primary target is torpedoes, and, if the enemy dreadnought lacks torpedoes, you could switch potentially switch ships. You must lock on to torpedoes before firing, since they are essentially impossible to hit without aim assist. Your second priority is turrets on the dreadnought, since this will allow your lighter ships to engage the enemy with greater ease. Finally, you can shoot at enemy engineers and destroyers in order to keep their healers busy and their destroyers at medium HP. All snipers should use Overclocked CPU.
Callouts
Callouts are communicating information in voice chat. Most wings will fly with some form of voice communication. In general, callouts are given to alert all players in the wing that their attention should be directed towards what you are calling. Therefore, this should be reserved for: events regarding bomb planting (both offensive and defensive bombs), the defense of your dreadnaught’s main systems (command tower, weapon cooler, or shield emitter), the defense of your engineer, or the overextension of enemy players. Callouts may also be given for heals to help your engineer realize that you are low on health. In certain situations, it may be useful to call out certain important cooldowns, like the Pilgrim’s Camouflage Shroud or Waz’Got’s Green Mist (if they are using this), or the command to begin attacking priority targets like a Tackler, Engineer, or a generally overextended player from their corporation. In most other cases, targets should mostly be called out by your tackler, as they will create the real opportunity to kill players.
Due to the chaotic nature of voice communication in games and the game mode itself, it is expected that players will use their best judgement before speaking, as it can severely dampen the entire wing’s ability to communicate if there is too much noise.
Ships
- Because Sector Conquest is a fundamentally different game mode with certain limitations (like a lack of static cover and greatly reduced sensor range), there are certain things that both the entire wing and individual pilots should consider.
Ships that are considered absolutely necessary in every wing
Before forming wings or even thinking about strategy, you should run a checklist of the “necessary” components of a wing. Lacking these ships will severely dampen your overall performance on both a tactical and strategic level.
- An Empire LRF: One of these is essential for quickly taking out torpedos.
- A sensor Tai'Kin: Due to the sensor range debuff, you will need at least one ship with multiple sensor range increases (aim for roughly 20km in the tooltip). Tai’Kin has the highest possible sensor range and outstanding mobility, making it the preferred choice.
- A Waz’Got with WL-13 EL Emitter, Alien Satellites and Gravi Wave: This is the best and safest engineer to keep your allies healthy. Look to maximize your effective range and survivability as you are a big target!
Ships that are considered “meta” as of 14 October 2019
- Empire LRF (see above): Archdragon, Project 1011, or Black Dragon
- For DPS: Wolfhound and Thar’Ga. While the wolfhound build is a fairly generic build (see the builds section), the Thar’Ga is a situational ship that should not be as cookie cutter as wolfhound.
- Tacklers: Lion Mk II and Sawtooth. The Lion Mk II is by far the most effective tackler for sector conquest. However, when playing in a position similar to the Thar’Ga (between the engineer and your frontline), it is by far the best ship. This is because it’s tackler module range is increased by a whopping 50%! The Rockwell is not an optimal substitute for this role. The Sawtooth is suited for killing enemy covert ops ships/
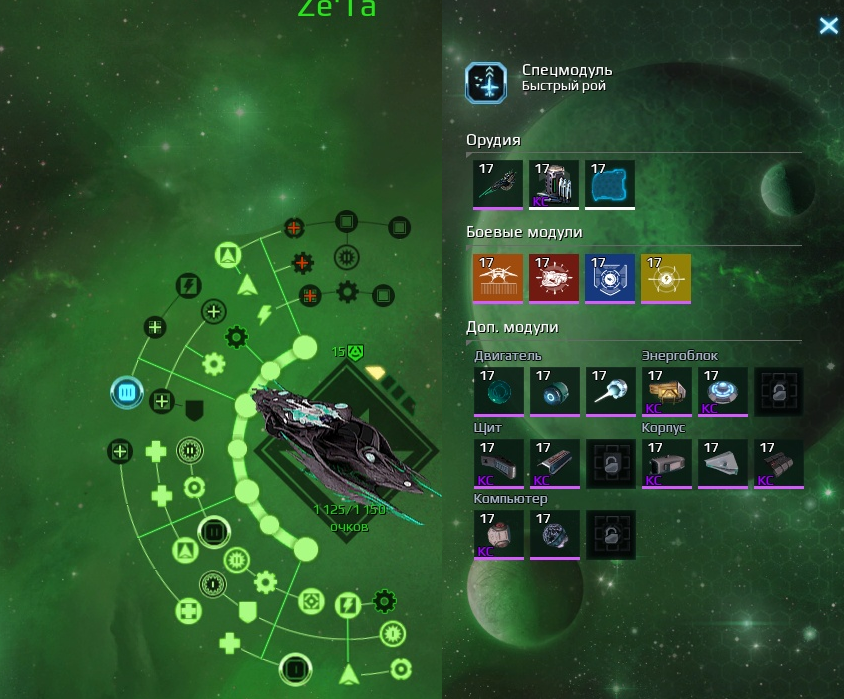
- Destroyers: Ze’Ta. The Ze’Ta is the most mobile destroyer with a good level of survivability, which makes it highly preferable for fulfilling this role. It is recommended that a maximum of 2 Ze’Ta’s are flown in a single formation, as having too many destroyers can severely dampen your mobility on a tactical and strategic level. Most Ze’Ta’s will run Pyro Emitter, Photon Emitter, Landing Platform, Gravitational Lens, and Fast Swarm.
- Bomb runners: Karud, Boremys. Both of these ships have incredible ability to tank, either through the Karud’s unique Shield Seal or the variety of guard modules available to the Boremys. These ships should get survivability from modules and mobility through crew and engine upgrades. Additionally, these ships should be avoided unless actively trying to plant bombs.
- Bomb defenders: Pilgrim. The Pilgrims unique Camouflage Shroud causes bomb planters to instantly lose their bomb. This is not to be flown every game, but only when you expect a bomb to be planted on one of your systems.
- Other: Granite. The general utility of this command fighter is not to be underestimated.
I am a new player and do not have any high-tier ships for Sector Conquest. What should I do?
At the current time of writing, the easiest high-tier ships to start off with in Sector Conquest are the Wolfhound and any LRF. The Wolfhound should be your goal for the manufacturable ships, with Granite and Project 1011 as secondary goals. Archdragon is considered viable and a strong silver ship, as is the Lion Mk II. Cheaper frigates and destroyers are largely not useful in this game mode so continuing to pursue them is not recommended.
Additionally, try to play some games as the game mode is highly rewarding and it will help build your experience. Even playing in T3 will give you similar amounts of rewards from mail and much-needed familiarity.
Strategies
You can approach countering these strategies in many ways: you can try to mirror them, try to utilize direct counters (which may or may not work if, for example, you deploy a Pilgrim, but it dies to their kill squads), or utilize indirect counters like counter-attacks or just plain dogfighting.
- Target Isolation: This strategy relies on having an extremely good tackler in a Lion Mk II or a Sawtooth. Rockwell is not suitable for this. The tackler looks to use their modules to immobilize a target and their team must immediately pounce on whoever the tackler targets. The tackler should build large amounts of resistance and a little bit of health, since they will inevitably be targeted by the enemy as they are the most critical part of this strategy, with a slight emphasis on thermal resistance to counter the Wolfhound meta. The tackler should be supported by lots of fast-moving gunships that are ready to burst a target (this screams Wolfhound and potentially Hive/Crystal Predator Thar’Ga, however, Wolfhound is best here). Additionally, the tackler should receive healing priority from the engineer.
- How to effectively play against this strategy:
- DO NOT OVEREXTEND AS A SMALL TARGET. Frigates are included as small targets. It is important that you move forward only as your destroyers pressure the healer and tackler backwards, and as a unit.
- Do not stay far away from your healer.
- Save Combat Reboot for when you are stunned by the tackler.
- Use your recon’s spy drones on the tackler whenever possible.
- Known effective counter-strategies:
- Double bomb-planting: where more than one bomb planter (the fast-moving tank boremys build and a standard karud build) attack two different systems at once.
- The use of a Granite to block CC[a][b] is invaluable.
- It is possible to match them at their own game if you are better and/or more coordinated than their team.
- It is difficult to run Eagle-M/nuke strategies against this team especially if they come prepared with a second tackler, however, it is possible to do this and the point gain is significant enough to win if done correctly. It is important that if their tackler ever moves to engage your interceptors, your team has to move forward and either kill the tackler or the healer.
- How to effectively play against this strategy:
- Single bomb planting: A single bomb planter will move towards one of your systems with the dedicated support of their wing.
- Executing this strategy:
- There is no significant tactical weakness to using this strategy as there is with the double plant strategy. However, your healer may have other concerns than the health of your gunships, so it is possible that you lose many players during your large push to plant.
- Priority targets should be eliminated before the bomb planter arrives at the system. This is why the Wolfhound is quite strong: it can effectively kill Waz’gots and Pilgrims, while being able to kill Heavy Repelling Drones, all while clearing minefields.
- How to effectively play against this strategy:
- Your recon (and in general the wing) should be wary of when enemy pilots are switching to bomb-planting ships (Boremys and Karud) and when they take the bomb. Spy Drones are useful for this.
- A great way to do this is to enable the enemies UI element. This will show you when people switch ships (it is common for people to switch to Boremys or Karud when they are dead) and will instantly show you when someone on the other team picks up the bomb.[c][d]
- Your engineer should have Gravi-Wave.
- If your wing repeatedly falls victim to this strategy, it should be mandatory that all destroyers can make use of Heavy Repelling Drones.
- Focus the bomb planter before they get to the system: they have enough tanky stats to absorb damage for quite a long period of time, especially since they will have help from their engineers. Do not target them too early, however, since they will just run away
- Keep your wing mobile, since, if you camp on one system, the bomb planter will go into the other.
- Your recon (and in general the wing) should be wary of when enemy pilots are switching to bomb-planting ships (Boremys and Karud) and when they take the bomb. Spy Drones are useful for this.
- Known effective counter-strategies:
- A coordinated tackler-based team should not fall victim to single bomb plant attacks.
- The use of a single Pilgrim with Camouflage Shroud can severely dampen the ability to bomb plant, however, you will be focused as much as engineers.
- Executing this strategy:
- Double bomb planting: More than one pilot on the enemy team will pick up bombs. Bombs have a 2 minute delay between spawning and therefore this strategy has several weaknesses and should only be used situationally. Best used against largely immobile wings or as a last ditch effort to bail a team out of a -50 to -100 point gap.
- Effectively executing this strategy:
- More than one player should have Boremys or Karud slotted. Your wing has to take a defensive mindset and posture during the majority of the battle, since you will not be looking to make offensive gestures for the first 4 minutes after this strategy has been decided upon.
- Priority targets become an even higher priority, namely Pilgrims and Waz’Gots, especially during the final push onto their dread.
- Synchronize your plants.
- Hopefully your recon can make some progress on at least one system so that your bomb planters can at least threaten to attack that system: a half health system is eliminated instantly with a bomb at the cost of at least 300 points.
- How to effectively play against this strategy:
- This strategy renders more than one player mostly useless in combat for several minutes (2-5 minutes is your “powerplay” window). Therefore, your main frontline can use this time to push forward towards their dreadnought and press the attack.
- It is absolutely essential that all bomb carriers are accounted for at all times, and that every pilot is aware of their position. Your recon will require help in order to do this, which is why you must start pushing forward: your recon can not possibly be expected to keep spy drones on all bomb carriers while operating deep behind enemy lines.
- Your engineers should always be running Gravi-Wave.
- If your wing repeatedly falls victim to this strategy, it should be made mandatory that all destroyers make use of the Heavy Repelling drone.
- Proactive action must be taken before bomb planters make it to your system.
- Effectively split your DPS and your reset abilities (like Gravi-Wave). Additionally, Pilgrims should stay supported so they aren’t picked off, but do not need to be sitting on a system that is already defended.
- The slower your wing (aka the higher your frigate and destroyer count), the harder it will be for you to counter this strategy.
- Known Counter-Strategies:
- Dogfight the enemy and press the attack onto their dreadnaught. They are effectively down one to two players while this strategy is acquiring bombs, and you could even force one of the planters to suicide their bomb and “reset” their strategy. You have a numerical advantage: use it.
- Coordinated tackler-based teams have a slight advantage. Additionally, the use of a pilgrim can greatly hinder this strategy.
- Effectively executing this strategy:
Adopting new Strategies
A hallmark of a great wing is the ability to adopt new strategies. The thing about any games’ particular meta is that it evolves over time and plays off of itself: if one strategy becomes extremely common in any meta, the direct counters will gradually increase in strength and presence in the meta. For example: if tacklers become too prevalent, abilities to reveal them while in stealth will become more used, crew settings will adapt to counter tackler effects, engineers will place higher priority on certain modules, Granite’s relative strength will increase because of its Antisabotage 2.1 module, and other effects in the meta that will cause tacklers to have been “countered’ or “figured out” and lead to their downfall in the meta even without any balance changes. Therefore, it is important that your wing not only experiments with many different strategies in order to have experience with things that may not be strong now but will be later, but also that you experiment against different strategies. Learning these strategies might be difficult, but it’s important that as a player you employ a growth mindset (a mindset where, instead of criticizing others or defending yourself for your failures, you acknowledge your own mistakes and try to not repeat them, or analyze what aided your successes and repeat them. There might be external reasons for your failures but a growth mindset will not focus on them) when learning to fly new ships or new styles. Additionally, leaders should evaluate whether players are ready to be trained to play other roles, or if the benefit is worth the cost to the player. If a leader can not be giving this training for any reason, someone should take this responsibility and train the player.
Countering Strategies
It’s on the leader to effectively change the wing’s composition in order to effectively counter the strategy used by the other wing, but another important concept to understand is that you must be playing a strategy you are familiar with in order to attempt to counter a particular strategy employed by another wing. While this may seem obvious, too many wings lose games because they fail to effectively counter strategies used against them. This can happen for a number of reasons, some of which I will list here:
- Your fleet lacks the ability to field a desirable counter to the strategy used by the opposing wing.
- Your fleet may be able to field the desirable counter but this counter gets countered, and you lose the game of counters at some point.
- Your pilots are unable to effectively fly crucial ships needed in this minigame of fleet composition.
Essentially, these scenarios are divided into two categories: either your fleet is limited in the ships they are taking, or your pilots lack the tactical or mechanical knowledge in order to fly the ships they need to be flying. This is an extreme generalization because all analyses of strategies are quite high up the ladder of abstraction in a game and there are so many individual factors at play that it would be impossible to consider them all. It’s important to realize that any combination of these individual factors could lead to a result that the guide isn’t telling you would happen, maybe ships aren’t upgraded so they lose every dogfight due to being inferior, or just get killed in some all-out slugfest. It’s mostly on the leader to quickly and accurately evaluate the reason the wing is not performing well and try to fix it, preferable during battle if possible.
Ship Building
In order to understand how to make an effective build for Sector Conquest, it is important to understand the tactical role you are fulfilling, and the tenants of that role that make the ships flying it effective. For example, as an engineer, your primary tactical role is to heal your team, therefore, it is not recommended that you run Heavy Blaster on engineer.
General Design Guidelines per role
- DPS (damage per second, basically, your damage dealers)
- DPS ships need to be mobile enough to avoid incoming fire and quickly move from one skirmish to another.
- Should always be running Combat Reboot to counter other bursty sources of damage or tackler crowd control.
- DPS ships need to have an extremely high amount of DPS available to them.
- Should not be extremely reliant on long cooldowns.
- Engineer (when looking at these guidelines, it’s immediately apparent that the Waz’Got is, at the time of writing, the perfect and only ship to fulfill this role)
- Should use a form of lasers for healing, since they are much easier to aim and therefore more effective than eclipse launcher.
- Should be able to have enough energy regeneration to supply healing to their team.
- Should be able to deliver a large amount of healing in a short amount of time.
- Static Barrier is useful since you are an easy target for LRFs and Destroyers.
- Should have some form of mobility in order to avoid enemy rushes.
- Destroyer (Destroyer is an interesting case study, since the role was not originally in the release of Star Conflict)
- Destroyers, despite their size, need to be mobile enough to somewhat avoid incoming fire and rushes (it is for this reason that Ze’Ta is optimal, since it is easily 2x as mobile as other ships in this role with Teleportation Sphere and Fast Swarm).
- Destroyers need to push out a sizeable amount of damage to the enemy in order to prevent medium-sized targets from moving forward.
- Destroyers are the optimal ships to engage combat drones, and should run modules to dispatch of them quickly.
- Destroyers need to have a somewhat significant amount of damage resistance.
- Recon
- Must be extremely mobile. Since they are such light targets, this comes naturally.
- Should be using Spy Drones and one additional module to reveal stealthed targets in order to keep track of enemy Covert Ops, Tacklers, and reduce healing.
- Must have an extreme amount of sensor range, since it is reduced in Sector Conquest.
- Should have a form of stealth to negate incoming missiles and distract (Hologram Crystal is perfect for this).
- Should be able to engage lighter targets somewhat effectively, since another good recon will challenge you in some circumstances.
- Tackler
- Mobility is not of utmost importance but is still a consideration, since you have your special module to hide from incoming damage.
- Resistances are key. An engineer can quickly heal smaller amounts of damage, so it is better to have high resistances so that you have a higher effective health pool when combined with an engineer’s support. Thermal and EM should be prioritized in the current Wolfhound meta, but do not neglect kinetic due to the prevalence of Ze’Ta and situational use of kinetic weapons on gunships.
Generic Ship Builds
These are basically cookie cutter and somewhat customizable but most of the core items should stay the same if you want to replicate the same style these builds use. Note that there are many options for ship builds, some are more optimal than others, but you should do your own experimentation to find what’s best for you. I don’t claim to think that these are the best builds, but they can be good starting points for at least good builds. Experiment with what is best for you, but use your best judgement in order to not become dead weight in the wing with a bad build.
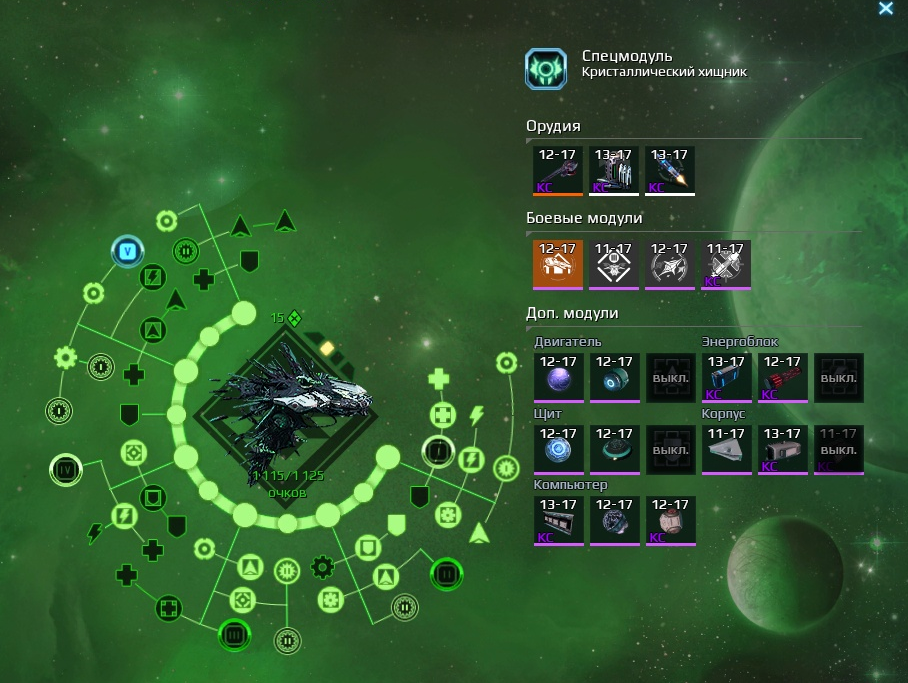
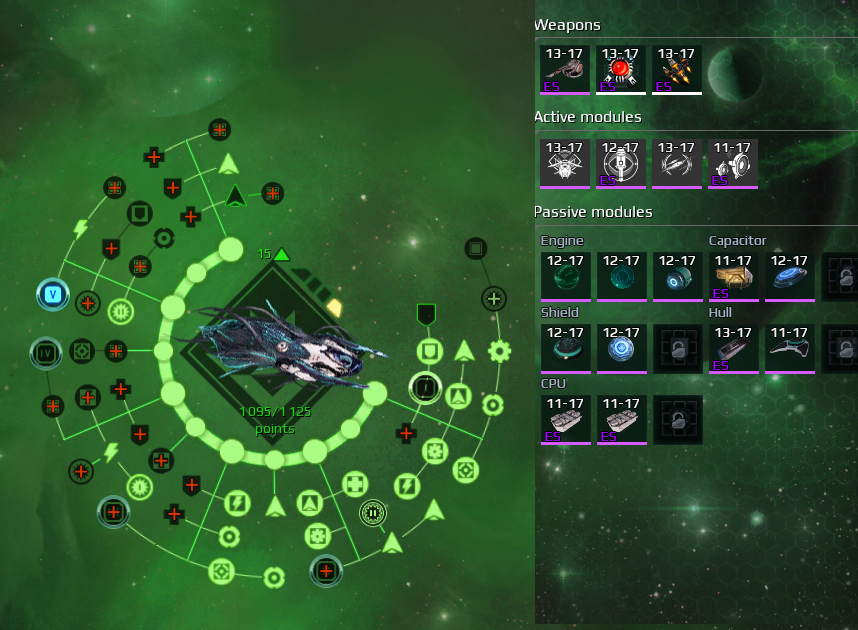
Wolfhound
This is a build used by battlestarsc2. This is a suggested build for beginners and is not necessarily the "best" build.
Note that you should only use regenerative coating if you will not have a Waz’Got on your team, and it is highly optional. Otherwise, Lightweight Hull is preferred. Crystal Plates is also recommended by some people. In any case, your Hull modifiers are the most flexible. Regenerative Coating can work with Wounded Beast Protocol because if you are in actual need of the stats Wounded Beast Protocol gives you, the Regenerative Coating will not cause them to go away.
Some people run with adaptive shield instead of EM resistance. This is up to your personal preference, but the advantage of EM resistance is taking less damage from other Wolfhounds in dogfights, while adaptive shield will help against all enemies until you get hit by a tackler. I use Auxiliary Shield Generator to increase my particle purge damage (which scales linearly with shield volume) to help deal with pesky interceptors or other agile targets, especially since sometimes you will have to hunt Covert Ops if your wing does not have someone else more equipped for this job.
If playing with high ping, double vernier is generally not a good idea - you won’t be able to maintain control of your rotation. If you have low ping, you could opt for more maneuverability with Lightweight Hull and Submatter Shields.
As always, you should take this build as a suggestion. Feel free to build as you choose.
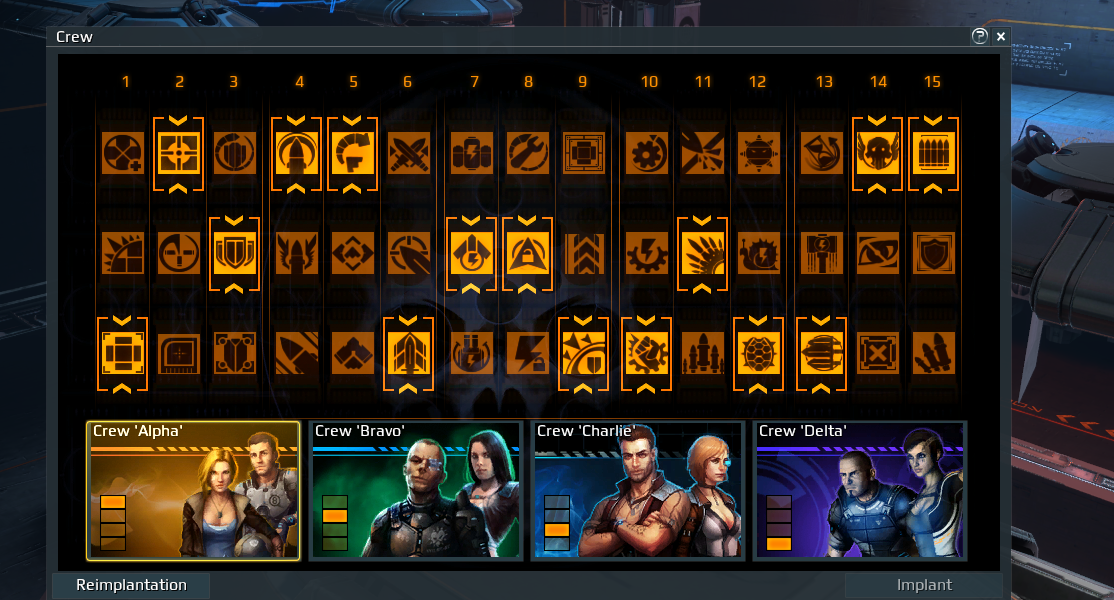
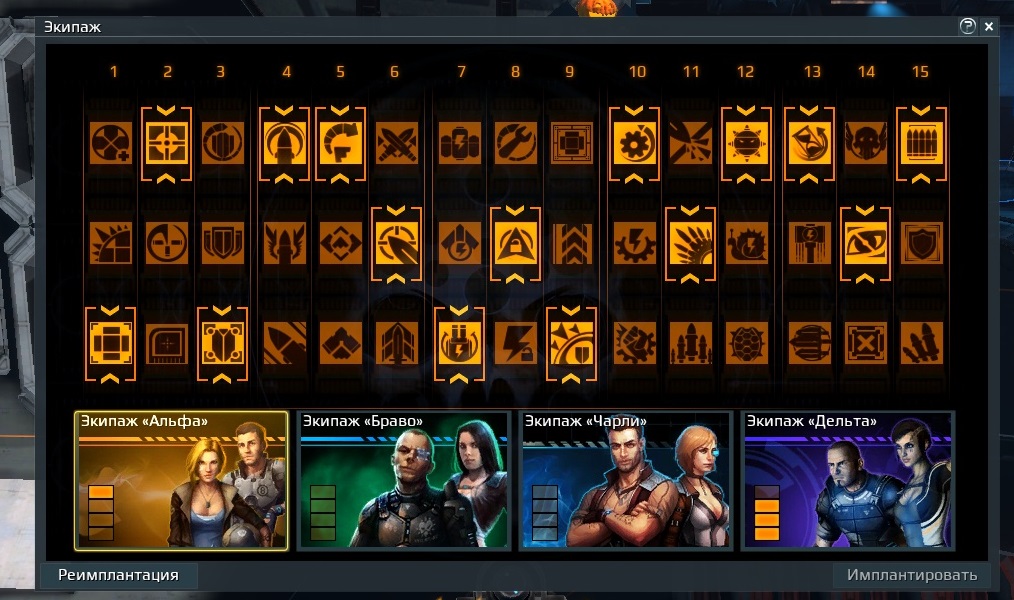
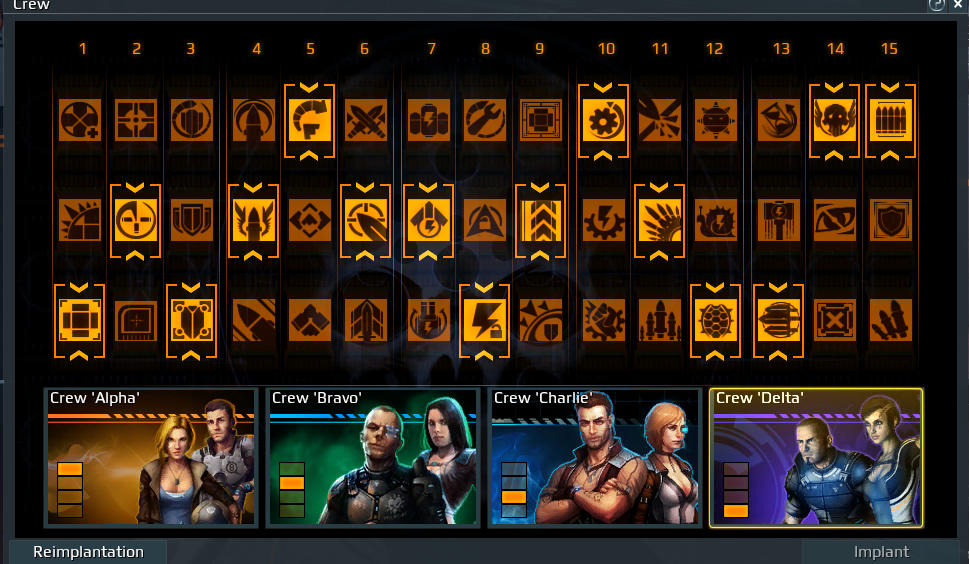
As for the crew settings, there are certain “unpopular choices” and possible substitutions, but, in general, this is highly customizable. It is not recommend to change 5a, 8b, 9c, and 14a, but you can if you wish, however, these seem to be the most optimal choices in their rank:
- 3b instead of 3c: while 3c has an argument for being more optimal, Particle Purge hits hard very quickly if you stack volume in this manner, and can kill certain targets in one shot if they have low EM resistance or hp pools.
- 10c instead of 10a: 10a helps with combat reboot and such, but 10c helps Particle purge even more.
- 13c: A personal preference that rewards a low-death playstyle.
- 14a: this is your choice, 14b may be better.
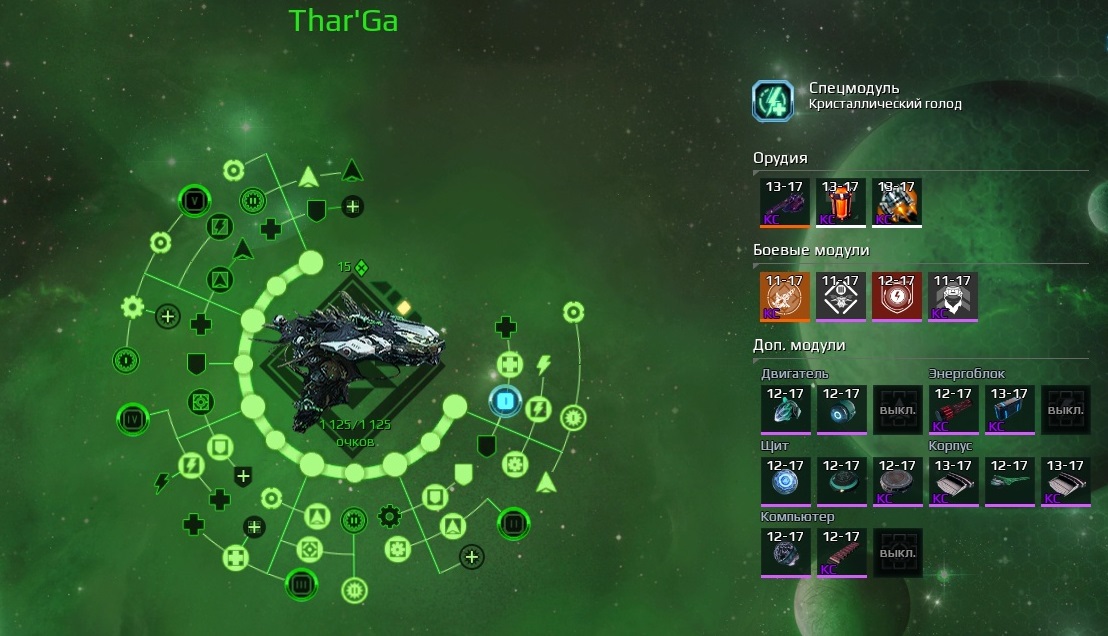
Thar’Ga
Long range build based around Crystal Predator and Gauss Cannons
Crew: Standard gunship crew with increased weapon range.
Thar’ga 2
Closer range brawler, not suited for turn style dogfighting.
Tai’Kin
Ze’Ta
Crew: Standard destroyer crew.

