User:Akaurl: Difference between revisions
No edit summary |
(→Advice: Added "Advice". Is open to editing if necessary.) |
||
| (14 intermediate revisions by one other user not shown) | |||
| Line 1: | Line 1: | ||
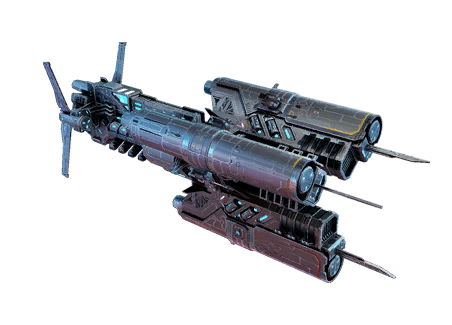
Frigates are the largest ships that can be piloted by players. They are considerably slower and less maneuverable than fighters, but much tougher. Frigates are at their best when supporting other ships, such as by repairing friendly ships, denying areas to the enemy and providing fire support from long range. | |||
==Roles== | ==Roles== | ||
=== | ===Engineering=== | ||
[[File: | [[File:Engineering.png|50px|link=Engineering]][[Engineering]] ships are designed for construction of auxiliary facilities on the battlefield, as well as for repair of allied ships. Engineers can build barriers, where allies can hide from enemy fire. In addition, they can use warp gates to transfer the allied ships across long distances. Together with their buildings, Engineering ships serve as a reliable rear guard for their team. They can repair allied ships, restore their shields, while their combat drones can help them cope with enemy attacks from the rear. | ||
=== | ===Guard=== | ||
[[File: | [[File:Guard.png|50px|link=Guard]][[Guard]] ships are designed to protect their team from enemy missiles, as well as enhance the defences of allied ships. In addition, their active modules can stop the enemy from using afterburner engines, and thus make them easier targets. Guard ships feature strong defences and an enhanced Phase Shield. However, these advantages are offset by the relatively small damage dealt by their main weapons. | ||
===Long Range=== | |||
=== | [[File:Long Range.png|50px|link=Long Range]]The name of this role speaks for itself. They are designed for long-range firing. [[Long Range]] Gunships can use their disintegrators or guided torpedoes (depending on the model of the ship) to fulfill this task. Their active modules provide them with extremely powerful special weapons and camouflage (when immobile). However, the application of high-power and long-range weapons comes at the cost of armour and shields. | ||
[[File: | |||
==Advice== | ==Advice== | ||
Each Frigate role has it's own overall playstyle. | |||
===Engineer=== | |||
The Engineer frigate has two main jobs: repair and utility. | |||
Repair Engineers should try to make extensive use of their repair buffs and stick with teammates as much as possible. For Open Space, this build is great for squad play, as well as keeping yourself alive longer. | |||
Utility Engineers should use their non-repair modules to make the team more effective. Deployable warp gates and shield walls, among others, are great for helping out the team! These are handy in Open Space as well, since the deployable warp gate helps with getting around, and a shield placed properly in a corner makes a nice little fort! | |||
===Guard=== | |||
Guard Frigates are just that: Guards. They excel at holding ground and protecting teammates. Use the pulsar and engine inhibitor modules to combat swarms, and the missile defense module is very useful, especially in PvP. Get to a beacon and defend it, or follow a friendly Engineer/LRF and protect them from enemies, since these two are priority targets for the enemy team. | |||
Open Space is where Guards take skill to use right. They are very slow, large targets that often have little cover or few nearby teammates to help them. Guards often get caught in the open where they get focused-fired and are eventually overwhelmed. When using Guards in Open Space, stay near cover as much as possible and avoid fighting swarms of enemies unless you are a much higher ranking Guard than the sector level is. | |||
===Long Range=== | |||
Long Range frigates are seen as incredibly annoying at a distance, but once in range they are easy kills. Empire LRFs should stay near max range and fire at weakened/slow targets. If it looks like you may have been spotted, move elsewhere, because once you are in a fight you can't get out! Reverse thrusters are the only option here. | |||
Jericho LRFs, on the other hand, are usually a bit tougher, and can fire from behind obstacles. This means that you should be a little closer to the fight than the Empire LRFs, and should fire upon enemies from behind asteroids and other cover. | |||
In Open Space, the very fact that makes Guards tricky to play (vast, open distances) makes LRFs perfect for long range combat. In Open Space, LRFs can even outrange Destroyers! However, unlike guards, the LRF is extremely vulnerable once enemies (whether players or AI) get into range. Open Space AI ''CAN'' see through Adaptive Camo and EM Shielding (the LRF's stealth ability), so be careful when relying on these! | |||
==Factions== | ==Factions== | ||
| Line 20: | Line 34: | ||
<div style="border-radius: 4px; border: 1px solid #8E8E8E; background-color: #BFBFBF; margin: 0 0 10px; padding: 8px;"> | <div style="border-radius: 4px; border: 1px solid #8E8E8E; background-color: #BFBFBF; margin: 0 0 10px; padding: 8px;"> | ||
<div style="margin: 5px 25px 10px 5px; display: inline-block; vertical-align: top; text-align: center;"> | <div style="margin: 5px 25px 10px 5px; display: inline-block; vertical-align: top; text-align: center;"> | ||
[[File: | [[File:Harpy.png|link=Harpy]]<br>III [[File:Long Range.png|20px]] [[Harpy]] | ||
</div> | </div> | ||
<div style="margin: 5px 25px 10px 5px; display: inline-block; vertical-align: top; text-align: center;"> | <div style="margin: 5px 25px 10px 5px; display: inline-block; vertical-align: top; text-align: center;"> | ||
[[File: | [[File:Siegfried.png|link=Siegfried]]<br>III [[File:Long Range.png|20px]] [[Siegfried]] [[File:GS.png]] | ||
</div> | </div> | ||
<div style="margin: 5px 25px 10px 5px; display: inline-block; vertical-align: top; text-align: center;"> | <div style="margin: 5px 25px 10px 5px; display: inline-block; vertical-align: top; text-align: center;"> | ||
[[File: | [[File:Iron_Harpy.png|link=Iron Harpy]]<br>IV [[File:Long Range.png|20px]] [[Iron Harpy]] | ||
</div> | </div> | ||
<div style="margin: 5px 25px 10px 5px; display: inline-block; vertical-align: top; text-align: center;"> | <div style="margin: 5px 25px 10px 5px; display: inline-block; vertical-align: top; text-align: center;"> | ||
[[File: | [[File:Steel_Harpy.png|link=Steel Harpy]]<br>V [[File:Long Range.png|20px]] [[Steel Harpy]] | ||
</div> | </div> | ||
<div style="margin: 5px 25px 10px 5px; display: inline-block; vertical-align: top; text-align: center;"> | <div style="margin: 5px 25px 10px 5px; display: inline-block; vertical-align: top; text-align: center;"> | ||
[[File: | [[File:Hydra.png|link=Hydra]]<br>VI [[File:Long Range.png|20px]] [[Hydra]] | ||
</div> | </div> | ||
<div style="margin: 5px 25px 10px 5px; display: inline-block; vertical-align: top; text-align: center;"> | <div style="margin: 5px 25px 10px 5px; display: inline-block; vertical-align: top; text-align: center;"> | ||
[[File: | [[File:Trooper.png|link=Trooper]]<br>VI [[File:Long Range.png|20px]] [[Trooper]] [[File:GS.png]] | ||
</div> | </div> | ||
<div style="margin: 5px 25px 10px 5px; display: inline-block; vertical-align: top; text-align: center;"> | <div style="margin: 5px 25px 10px 5px; display: inline-block; vertical-align: top; text-align: center;"> | ||
[[File: | [[File:Hydra_2.png|link=Hydra 2]]<br>VI [[File:Engineering.png|20px]] [[Hydra 2]] | ||
</div> | </div> | ||
<div style="margin: 5px 25px 10px 5px; display: inline-block; vertical-align: top; text-align: center;"> | <div style="margin: 5px 25px 10px 5px; display: inline-block; vertical-align: top; text-align: center;"> | ||
[[File: | [[File:Acid_Hydra.png|link=Acid Hydra]]<br>VII [[File:Long Range.png|20px]] [[Acid Hydra]] | ||
</div> | </div> | ||
<div style="margin: 5px 25px 10px 5px; display: inline-block; vertical-align: top; text-align: center;"> | <div style="margin: 5px 25px 10px 5px; display: inline-block; vertical-align: top; text-align: center;"> | ||
[[File: | [[File:Cerberus.png|link=Cerberus]]<br>VIII [[File:Long Range.png|20px]] [[Cerberus]] | ||
</div> | </div> | ||
<div style="margin: 5px 25px 10px 5px; display: inline-block; vertical-align: top; text-align: center;"> | <div style="margin: 5px 25px 10px 5px; display: inline-block; vertical-align: top; text-align: center;"> | ||
[[File: | [[File:Phoenix.png|link=Phoenix]]<br>VIII [[File:Engineering.png|20px]] [[Phoenix]] [[File:GS.png]] | ||
</div> | </div> | ||
<div style="margin: 5px 25px 10px 5px; display: inline-block; vertical-align: top; text-align: center;"> | <div style="margin: 5px 25px 10px 5px; display: inline-block; vertical-align: top; text-align: center;"> | ||
[[File: | [[File:Sigurdr.png|link=Sigurdr]]<br>IX [[File:Long Range.png|20px]] [[Sigurdr]] [[File:GS.png]] | ||
</div> | </div> | ||
<div style="margin: 5px 25px 10px 5px; display: inline-block; vertical-align: top; text-align: center;"> | <div style="margin: 5px 25px 10px 5px; display: inline-block; vertical-align: top; text-align: center;"> | ||
[[File: | [[File:Styx.png|link=Styx]]<br>IX [[File:Engineering.png|20px]] [[Styx]] | ||
</div> | </div> | ||
<div style="margin: 5px 25px 10px 5px; display: inline-block; vertical-align: top; text-align: center;"> | <div style="margin: 5px 25px 10px 5px; display: inline-block; vertical-align: top; text-align: center;"> | ||
[[File: | [[File:Garm.png|link=Garm]]<br>X [[File:Engineering.png|20px]] [[Garm]] | ||
</div> | </div> | ||
<div style="margin: 5px 25px 10px 5px; display: inline-block; vertical-align: top; text-align: center;"> | <div style="margin: 5px 25px 10px 5px; display: inline-block; vertical-align: top; text-align: center;"> | ||
[[File: | [[File:Centaur.png|link=Centaur]]<br>XI [[File:Long Range.png|20px]] [[Centaur]] | ||
</div> | </div> | ||
<div style="margin: 5px 25px 10px 5px; display: inline-block; vertical-align: top; text-align: center;"> | <div style="margin: 5px 25px 10px 5px; display: inline-block; vertical-align: top; text-align: center;"> | ||
[[File: | [[File:Minotaur.png|link=Minotaur]]<br>XI [[File:Engineering.png|20px]] [[Minotaur]] | ||
</div> | </div> | ||
<div style="margin: 5px 25px 10px 5px; display: inline-block; vertical-align: top; text-align: center;"> | <div style="margin: 5px 25px 10px 5px; display: inline-block; vertical-align: top; text-align: center;"> | ||
[[File: | [[File:Chiron.png|link=Chiron]]<br>XII [[File:Long Range.png|20px]] [[Chiron]] | ||
</div> | </div> | ||
<div style="margin: 5px 25px 10px 5px; display: inline-block; vertical-align: top; text-align: center;"> | <div style="margin: 5px 25px 10px 5px; display: inline-block; vertical-align: top; text-align: center;"> | ||
[[File: | [[File:Atlas.png|link=Atlas]]<br>XII [[File:Long Range.png|20px]] [[Atlas]] [[File:GS.png]] | ||
</div> | </div> | ||
<div style="margin: 5px 25px 10px 5px; display: inline-block; vertical-align: top; text-align: center;"> | <div style="margin: 5px 25px 10px 5px; display: inline-block; vertical-align: top; text-align: center;"> | ||
[[File: | [[File:Dragon.png|link=Dragon]]<br>XIII [[File:Long Range.png|20px]] [[Dragon]] | ||
</div> | </div> | ||
<div style="margin: 5px 25px 10px 5px; display: inline-block; vertical-align: top; text-align: center;"> | <div style="margin: 5px 25px 10px 5px; display: inline-block; vertical-align: top; text-align: center;"> | ||
[[File: | [[File:Brokk.png|link=Brokk]]<br>XIII [[File:Engineering.png|20px]] [[Brokk]] [[File:GS.png]] | ||
</div> | </div> | ||
<div style="margin: 5px 25px 10px 5px; display: inline-block; vertical-align: top; text-align: center;"> | <div style="margin: 5px 25px 10px 5px; display: inline-block; vertical-align: top; text-align: center;"> | ||
[[File: | [[File:Naga.png|link=Naga]]<br>XIV [[File:Engineering.png|20px]] [[Naga]] | ||
</div> | </div> | ||
<div style="margin: 5px 25px 10px 5px; display: inline-block; vertical-align: top; text-align: center;"> | <div style="margin: 5px 25px 10px 5px; display: inline-block; vertical-align: top; text-align: center;"> | ||
[[File: | [[File:Archdragon.png|link=Archdragon]]<br>XV [[File:Long Range.png|20px]] [[Archdragon]] | ||
</div> | </div> | ||
<div style="margin: 5px 25px 10px 5px; display: inline-block; vertical-align: top; text-align: center;"> | <div style="margin: 5px 25px 10px 5px; display: inline-block; vertical-align: top; text-align: center;"> | ||
[[File: | [[File:Black_Dragon.png|link=Black Dragon]]<br>XV [[File:Long Range.png|20px]] [[Black Dragon]] [[File:GS.png]] | ||
</div> | </div> | ||
<div style="margin: 5px 25px 10px 5px; display: inline-block; vertical-align: top; text-align: center;"> | <div style="margin: 5px 25px 10px 5px; display: inline-block; vertical-align: top; text-align: center;"> | ||
[[File: | [[File:Kraken.png|link=Kraken]]<br>XV [[File:Long Range.png|20px]] [[Kraken]] | ||
</div> | </div> | ||
</div> | </div> | ||
| Line 94: | Line 108: | ||
<div style="border-radius: 4px; border: 1px solid #8E8E8E; background-color: #BFBFBF; margin: 0 0 10px; padding: 8px;"> | <div style="border-radius: 4px; border: 1px solid #8E8E8E; background-color: #BFBFBF; margin: 0 0 10px; padding: 8px;"> | ||
<div style="margin: 5px 25px 10px 5px; display: inline-block; vertical-align: top; text-align: center;"> | <div style="margin: 5px 25px 10px 5px; display: inline-block; vertical-align: top; text-align: center;"> | ||
[[File: | [[File:Raptor.png|link=Raptor]]<br>II [[File:Engineering.png|20px]] [[Raptor]] | ||
</div> | |||
<div style="margin: 5px 25px 10px 5px; display: inline-block; vertical-align: top; text-align: center;"> | |||
[[File:Raptor-M.png|link=Raptor-M]]<br>III [[File:Engineering.png|20px]] [[Raptor-M]] | |||
</div> | |||
<div style="margin: 5px 25px 10px 5px; display: inline-block; vertical-align: top; text-align: center;"> | |||
[[File:Raptor-M-2.png|link=Raptor-M-2]]<br>III [[File:Engineering.png|20px]] [[Raptor-M-2]] [[File:GS.png]] | |||
</div> | |||
<div style="margin: 5px 25px 10px 5px; display: inline-block; vertical-align: top; text-align: center;"> | |||
[[File:Raptor_Mk_II.png|link=Raptor Mk II]]<br>IV [[File:Engineering.png|20px]] [[Raptor Mk II]] | |||
</div> | |||
<div style="margin: 5px 25px 10px 5px; display: inline-block; vertical-align: top; text-align: center;"> | |||
[[File:Alligator-C.png|link=Alligator-C]]<br>V [[File:Guard.png|20px]] [[Alligator-C]] | |||
</div> | |||
<div style="margin: 5px 25px 10px 5px; display: inline-block; vertical-align: top; text-align: center;"> | |||
[[File:Alligator-M.png|link=Alligator-M]]<br>VI [[File:Engineering.png|20px]] [[Alligator-M]] | |||
</div> | |||
<div style="margin: 5px 25px 10px 5px; display: inline-block; vertical-align: top; text-align: center;"> | |||
[[File:Honor.png|link=Honor]]<br>VI [[File:Engineering.png|20px]] [[Honor]] [[File:GS.png]] | |||
</div> | |||
<div style="margin: 5px 25px 10px 5px; display: inline-block; vertical-align: top; text-align: center;"> | |||
[[File:Archelon.png|link=Archelon]]<br>VII [[File:Guard.png|20px]] [[Archelon]] [[File:GS.png]] | |||
</div> | |||
<div style="margin: 5px 25px 10px 5px; display: inline-block; vertical-align: top; text-align: center;"> | |||
[[File:Alligator_Mk_II.png|link=Alligator Mk II]]<br>VII [[File:Engineering.png|20px]] [[Alligator Mk II]] | |||
</div> | |||
<div style="margin: 5px 25px 10px 5px; display: inline-block; vertical-align: top; text-align: center;"> | |||
[[File:Reaper.png|link=Reaper]]<br>VIII [[File:Guard.png|20px]] [[Reaper]] [[File:GS.png]] | |||
</div> | |||
<div style="margin: 5px 25px 10px 5px; display: inline-block; vertical-align: top; text-align: center;"> | |||
[[File:Anaconda.png|link=Anaconda]]<br>VIII [[File:Engineering.png|20px]] [[Anaconda]] | |||
</div> | |||
<div style="margin: 5px 25px 10px 5px; display: inline-block; vertical-align: top; text-align: center;"> | |||
[[File:Anaconda-M.png|link=Anaconda-M]]<br>IX [[File:Guard.png|20px]] [[Anaconda-M]] | |||
</div> | |||
<div style="margin: 5px 25px 10px 5px; display: inline-block; vertical-align: top; text-align: center;"> | |||
[[File:Valor.png|link=Valor]]<br>IX [[File:Engineering.png|20px]] [[Valor]] [[File:GS.png]] | |||
</div> | |||
<div style="margin: 5px 25px 10px 5px; display: inline-block; vertical-align: top; text-align: center;"> | |||
[[File:Anaconda_Mk_II.png|link=Anaconda Mk II]]<br>X [[File:Guard.png|20px]] [[Anaconda Mk II]] | |||
</div> | </div> | ||
<div style="margin: 5px 25px 10px 5px; display: inline-block; vertical-align: top; text-align: center;"> | <div style="margin: 5px 25px 10px 5px; display: inline-block; vertical-align: top; text-align: center;"> | ||
[[File: | [[File:Grizzly.png|link=Grizzly]]<br>XI [[File:Engineering.png|20px]] [[Grizzly]] | ||
</div> | </div> | ||
<div style="margin: 5px 25px 10px 5px; display: inline-block; vertical-align: top; text-align: center;"> | <div style="margin: 5px 25px 10px 5px; display: inline-block; vertical-align: top; text-align: center;"> | ||
[[File: | [[File:Grizzly Mk II.png|link=Grizzly Mk II]]<br>XI [[File:Guard.png|20px]] [[Grizzly Mk II]] | ||
</div> | </div> | ||
<div style="margin: 5px 25px 10px 5px; display: inline-block; vertical-align: top; text-align: center;"> | <div style="margin: 5px 25px 10px 5px; display: inline-block; vertical-align: top; text-align: center;"> | ||
[[File: | [[File:Grizzly-M.png|link=Grizzly-M]]<br>XII [[File:Engineering.png|20px]] [[Grizzly-M]] | ||
</div> | </div> | ||
<div style="margin: 5px 25px 10px 5px; display: inline-block; vertical-align: top; text-align: center;"> | <div style="margin: 5px 25px 10px 5px; display: inline-block; vertical-align: top; text-align: center;"> | ||
[[File: | [[File:Polus.png|link=Polus]]<br>XII [[File:Engineering.png|20px]] [[Polus]] [[File:GS.png]] | ||
</div> | </div> | ||
<div style="margin: 5px 25px 10px 5px; display: inline-block; vertical-align: top; text-align: center;"> | <div style="margin: 5px 25px 10px 5px; display: inline-block; vertical-align: top; text-align: center;"> | ||
[[File: | [[File:Osprey.png|link=Osprey]]<br>XIII [[File:Engineering.png|20px]] [[Osprey]] | ||
</div> | </div> | ||
<div style="margin: 5px 25px 10px 5px; display: inline-block; vertical-align: top; text-align: center;"> | <div style="margin: 5px 25px 10px 5px; display: inline-block; vertical-align: top; text-align: center;"> | ||
[[File: | [[File:T-Rex_Mk_II.png|link=T-Rex Mk II]]<br>XIV [[File:Guard.png|20px]] [[T-Rex Mk II]] | ||
</div> | </div> | ||
<div style="margin: 5px 25px 10px 5px; display: inline-block; vertical-align: top; text-align: center;"> | <div style="margin: 5px 25px 10px 5px; display: inline-block; vertical-align: top; text-align: center;"> | ||
[[File: | [[File:T-Rex.png|link=T-Rex]]<br>XV [[File:Engineering.png|20px]] [[T-Rex]] | ||
</div> | </div> | ||
<div style="margin: 5px 25px 10px 5px; display: inline-block; vertical-align: top; text-align: center;"> | <div style="margin: 5px 25px 10px 5px; display: inline-block; vertical-align: top; text-align: center;"> | ||
[[File: | [[File:Mammoth.png|link=Mammoth]]<br>XV [[File:Engineering.png|20px]] [[Mammoth]] [[File:GS.png]] | ||
</div> | </div> | ||
<div style="margin: 5px 25px 10px 5px; display: inline-block; vertical-align: top; text-align: center;"> | <div style="margin: 5px 25px 10px 5px; display: inline-block; vertical-align: top; text-align: center;"> | ||
[[File: | [[File:Octopus.png|link=Octopus]]<br>XV [[File:Engineering.png|20px]] [[Octopus]] | ||
</div> | </div> | ||
</div> | </div> | ||
| Line 128: | Line 181: | ||
<!--Jericho--> | <!--Jericho--> | ||
<div style="border-radius: 4px; border: 1px solid #8E8E8E; background-color: #BFBFBF; margin: 0 0 10px; padding: 8px;"> | <div style="border-radius: 4px; border: 1px solid #8E8E8E; background-color: #BFBFBF; margin: 0 0 10px; padding: 8px;"> | ||
<div style="margin: 5px 25px 10px 5px; display: inline-block; vertical-align: top; text-align: center;"> | |||
[[File:Zealot.png|link=Zealot]]<br>II [[File:Guard.png|20px]] [[Zealot]] | |||
</div> | |||
<div style="margin: 5px 25px 10px 5px; display: inline-block; vertical-align: top; text-align: center;"> | |||
[[File:Palom.png|link=Palom]]<br>III [[File:Guard.png|20px]] [[Palom]] [[File:GS.png]] | |||
</div> | |||
<div style="margin: 5px 25px 10px 5px; display: inline-block; vertical-align: top; text-align: center;"> | |||
[[File:Zealot_AE.png|link=Zealot AE]]<br>IV [[File:Guard.png|20px]] [[Zealot AE]] | |||
</div> | |||
<div style="margin: 5px 25px 10px 5px; display: inline-block; vertical-align: top; text-align: center;"> | |||
[[File:Neuron_Zealot.png|link=Neuron Zealot]]<br>V [[File:Guard.png|20px]] [[Neuron Zealot]] | |||
</div> | |||
<div style="margin: 5px 25px 10px 5px; display: inline-block; vertical-align: top; text-align: center;"> | |||
[[File:Crus_Q.png|link=Crus Q]]<br>VI [[File:Guard.png|20px]] [[Crus Q]] [[File:GS.png]] | |||
</div> | |||
<div style="margin: 5px 25px 10px 5px; display: inline-block; vertical-align: top; text-align: center;"> | |||
[[File:Templar.png|link=Templar]]<br>VI [[File:Long Range.png|20px]] [[Templar]] | |||
</div> | |||
<div style="margin: 5px 25px 10px 5px; display: inline-block; vertical-align: top; text-align: center;"> | |||
[[File:Priest_Bartle.png|link=Priest Bartle]]<br>VI [[File:Long Range.png|20px]] [[Priest Bartle]] [[File:GS.png]] | |||
</div> | |||
<div style="margin: 5px 25px 10px 5px; display: inline-block; vertical-align: top; text-align: center;"> | |||
[[File:Templar_S.png|link=Templar S]]<br>VII [[File:Guard.png|20px]] [[Templar S]] | |||
</div> | |||
<div style="margin: 5px 25px 10px 5px; display: inline-block; vertical-align: top; text-align: center;"> | |||
[[File:Templar_AE.png|link=Templar AE]]<br>VII [[File:Long Range.png|20px]] [[Templar AE]] | |||
</div> | |||
<div style="margin: 5px 25px 10px 5px; display: inline-block; vertical-align: top; text-align: center;"> | |||
[[File:Crusader.png|link=Crusader]]<br>VIII [[File:Guard.png|20px]] [[Crusader]] | |||
</div> | |||
<div style="margin: 5px 25px 10px 5px; display: inline-block; vertical-align: top; text-align: center;"> | |||
[[File:Crus_S.png|link=Crus S]]<br>IX [[File:Guard.png|20px]] [[Crus S]] | |||
</div> | |||
<div style="margin: 5px 25px 10px 5px; display: inline-block; vertical-align: top; text-align: center;"> | |||
[[File:Blood_Tormentor.png|link=Blood Tormentor]]<br>IX [[File:Guard.png|20px]] [[Blood Tormentor]] [[File:GS.png]] | |||
</div> | |||
<div style="margin: 5px 25px 10px 5px; display: inline-block; vertical-align: top; text-align: center;"> | |||
[[File:Ira_Deus.png|link=Ira Deus]]<br>IX [[File:Long Range.png|20px]] [[Ira Deus]] | |||
</div> | |||
<div style="margin: 5px 25px 10px 5px; display: inline-block; vertical-align: top; text-align: center;"> | |||
[[File:Crus_A.png|link=Crus A]]<br>IX [[File:Long Range.png|20px]] [[Crus A]] [[File:GS.png]] | |||
</div> | |||
<div style="margin: 5px 25px 10px 5px; display: inline-block; vertical-align: top; text-align: center;"> | |||
[[File:Tormentor.png|link=Tormentor]]<br>X [[File:Guard.png|20px]] [[Tormentor]] | |||
</div> | |||
<div style="margin: 5px 25px 10px 5px; display: inline-block; vertical-align: top; text-align: center;"> | |||
[[File:Tormentor_AE.png|link=Tormentor AE]]<br>XI [[File:Long Range.png|20px]] [[Tormentor AE]] | |||
</div> | |||
<div style="margin: 5px 25px 10px 5px; display: inline-block; vertical-align: top; text-align: center;"> | |||
[[File:Tormentor_S.png|link=Tormentor S]]<br>XII [[File:Guard.png|20px]] [[Tormentor S]] | |||
</div> | |||
<div style="margin: 5px 25px 10px 5px; display: inline-block; vertical-align: top; text-align: center;"> | |||
[[File:Scimitar.png|link=Scimitar]]<br>XII [[File:Guard.png|20px]] [[Scimitar]] [[File:GS.png]] | |||
</div> | |||
<div style="margin: 5px 25px 10px 5px; display: inline-block; vertical-align: top; text-align: center;"> | |||
[[File:Inquisitor.png|link=Inquisitor]]<br>XIII [[File:Guard.png|20px]] [[Inquisitor]] | |||
</div> | |||
<div style="margin: 5px 25px 10px 5px; display: inline-block; vertical-align: top; text-align: center;"> | |||
[[File:Mauler.png|link=Mauler]]<br>XIII [[File:Long Range.png|20px]] [[Mauler]] [[File:GS.png]] | |||
</div> | |||
<div style="margin: 5px 25px 10px 5px; display: inline-block; vertical-align: top; text-align: center;"> | |||
[[File:Inquisitor_AE.png|link=Inquisitor AE]]<br>XIV [[File:Long Range.png|20px]] [[Inquisitor AE]] | |||
</div> | |||
<div style="margin: 5px 25px 10px 5px; display: inline-block; vertical-align: top; text-align: center;"> | |||
[[File:Inquisitor_S.png|link=Inquisitor S]]<br>XV [[File:Guard.png|20px]] [[Inquisitor S]] | |||
</div> | |||
<div style="margin: 5px 25px 10px 5px; display: inline-block; vertical-align: top; text-align: center;"> | |||
[[File:Patriarch.png|link=Patriarch]]<br>XV [[File:Guard.png|20px]] [[Patriarch]] [[File:GS.png]] | |||
</div> | |||
<div style="margin: 5px 25px 10px 5px; display: inline-block; vertical-align: top; text-align: center;"> | |||
[[File:Ronin.png|link=Ronin]]<br>XV [[File:Guard.png|20px]] [[Ronin]] | |||
</div> | |||
</div> | </div> | ||
<!--/Jericho--> | <!--/Jericho--> | ||
Latest revision as of 17:21, 18 July 2016
Frigates are the largest ships that can be piloted by players. They are considerably slower and less maneuverable than fighters, but much tougher. Frigates are at their best when supporting other ships, such as by repairing friendly ships, denying areas to the enemy and providing fire support from long range.
Roles
Engineering
 Engineering ships are designed for construction of auxiliary facilities on the battlefield, as well as for repair of allied ships. Engineers can build barriers, where allies can hide from enemy fire. In addition, they can use warp gates to transfer the allied ships across long distances. Together with their buildings, Engineering ships serve as a reliable rear guard for their team. They can repair allied ships, restore their shields, while their combat drones can help them cope with enemy attacks from the rear.
Guard
 Guard ships are designed to protect their team from enemy missiles, as well as enhance the defences of allied ships. In addition, their active modules can stop the enemy from using afterburner engines, and thus make them easier targets. Guard ships feature strong defences and an enhanced Phase Shield. However, these advantages are offset by the relatively small damage dealt by their main weapons.
Long Range
 The name of this role speaks for itself. They are designed for long-range firing. Long Range Gunships can use their disintegrators or guided torpedoes (depending on the model of the ship) to fulfill this task. Their active modules provide them with extremely powerful special weapons and camouflage (when immobile). However, the application of high-power and long-range weapons comes at the cost of armour and shields.
Advice
Each Frigate role has it's own overall playstyle.
Engineer
The Engineer frigate has two main jobs: repair and utility.
Repair Engineers should try to make extensive use of their repair buffs and stick with teammates as much as possible. For Open Space, this build is great for squad play, as well as keeping yourself alive longer.
Utility Engineers should use their non-repair modules to make the team more effective. Deployable warp gates and shield walls, among others, are great for helping out the team! These are handy in Open Space as well, since the deployable warp gate helps with getting around, and a shield placed properly in a corner makes a nice little fort!
Guard
Guard Frigates are just that: Guards. They excel at holding ground and protecting teammates. Use the pulsar and engine inhibitor modules to combat swarms, and the missile defense module is very useful, especially in PvP. Get to a beacon and defend it, or follow a friendly Engineer/LRF and protect them from enemies, since these two are priority targets for the enemy team.
Open Space is where Guards take skill to use right. They are very slow, large targets that often have little cover or few nearby teammates to help them. Guards often get caught in the open where they get focused-fired and are eventually overwhelmed. When using Guards in Open Space, stay near cover as much as possible and avoid fighting swarms of enemies unless you are a much higher ranking Guard than the sector level is.
Long Range
Long Range frigates are seen as incredibly annoying at a distance, but once in range they are easy kills. Empire LRFs should stay near max range and fire at weakened/slow targets. If it looks like you may have been spotted, move elsewhere, because once you are in a fight you can't get out! Reverse thrusters are the only option here.
Jericho LRFs, on the other hand, are usually a bit tougher, and can fire from behind obstacles. This means that you should be a little closer to the fight than the Empire LRFs, and should fire upon enemies from behind asteroids and other cover.
In Open Space, the very fact that makes Guards tricky to play (vast, open distances) makes LRFs perfect for long range combat. In Open Space, LRFs can even outrange Destroyers! However, unlike guards, the LRF is extremely vulnerable once enemies (whether players or AI) get into range. Open Space AI CAN see through Adaptive Camo and EM Shielding (the LRF's stealth ability), so be careful when relying on these!
Factions
Empire
III ![]() Harpy
Harpy
III ![]() Siegfried
Siegfried ![]()
IV ![]() Iron Harpy
Iron Harpy
VI ![]() Hydra
Hydra
VI ![]() Trooper
Trooper ![]()
VI ![]() Hydra 2
Hydra 2
VII ![]() Acid Hydra
Acid Hydra
VIII ![]() Cerberus
Cerberus
VIII ![]() Phoenix
Phoenix ![]()
IX ![]() Sigurdr
Sigurdr ![]()

IX ![]() Styx
Styx
X ![]() Garm
Garm
XI ![]() Centaur
Centaur
XI ![]() Minotaur
Minotaur

XII ![]() Chiron
Chiron

XII ![]() Atlas
Atlas ![]()
XIII ![]() Dragon
Dragon
XIII ![]() Brokk
Brokk ![]()
XIV ![]() Naga
Naga
XV ![]() Archdragon
Archdragon
XV ![]() Black Dragon
Black Dragon ![]()
XV ![]() Kraken
Kraken
Federation
II ![]() Raptor
Raptor
III ![]() Raptor-M
Raptor-M
III ![]() Raptor-M-2
Raptor-M-2 ![]()
IV ![]() Raptor Mk II
Raptor Mk II
VI ![]() Alligator-M
Alligator-M
VI ![]() Honor
Honor ![]()
VII ![]() Archelon
Archelon ![]()
VII ![]() Alligator Mk II
Alligator Mk II

VIII ![]() Reaper
Reaper ![]()
VIII ![]() Anaconda
Anaconda
IX ![]() Anaconda-M
Anaconda-M
IX ![]() Valor
Valor ![]()
XI ![]() Grizzly
Grizzly

XII ![]() Grizzly-M
Grizzly-M
XII ![]() Polus
Polus ![]()
XIII ![]() Osprey
Osprey
XIV ![]() T-Rex Mk II
T-Rex Mk II
XV ![]() T-Rex
T-Rex
XV ![]() Mammoth
Mammoth ![]()
XV ![]() Octopus
Octopus
Jericho
II ![]() Zealot
Zealot
III ![]() Palom
Palom ![]()
IV ![]() Zealot AE
Zealot AE
VI ![]() Crus Q
Crus Q ![]()
VI ![]() Templar
Templar
VII ![]() Templar S
Templar S
VII ![]() Templar AE
Templar AE
VIII ![]() Crusader
Crusader

IX ![]() Crus S
Crus S
IX ![]() Ira Deus
Ira Deus

IX ![]() Crus A
Crus A ![]()
XI ![]() Tormentor AE
Tormentor AE
XII ![]() Tormentor S
Tormentor S

XII ![]() Scimitar
Scimitar ![]()

XIII ![]() Inquisitor
Inquisitor
XIII ![]() Mauler
Mauler ![]()
XIV ![]() Inquisitor AE
Inquisitor AE
XV ![]() Inquisitor S
Inquisitor S

XV ![]() Patriarch
Patriarch ![]()
XV ![]() Ronin
Ronin